
Administration guide · 1 of 2
Setting up the mail server: domains, mailboxes, DNS and migration
The WorkOrderAgent comes with its own mail server, including a spam filter and webmail. This guide takes you from installation through domains, mailboxes, forwarding and DNS to migrating from a previous provider.
For administrators of your WorkOrderAgent. All examples use the placeholders example.de and 203.0.113.10.
Installing the mail server
Menu Einstellungen Mailserver
If the mail server is enabled for your tenant, you will find the server section at the top of Einstellungen → Mailserver (Settings → Mail server). The indicators on the right show whether the mail server is installed and whether Postfix, Dovecot and Rspamd are running.
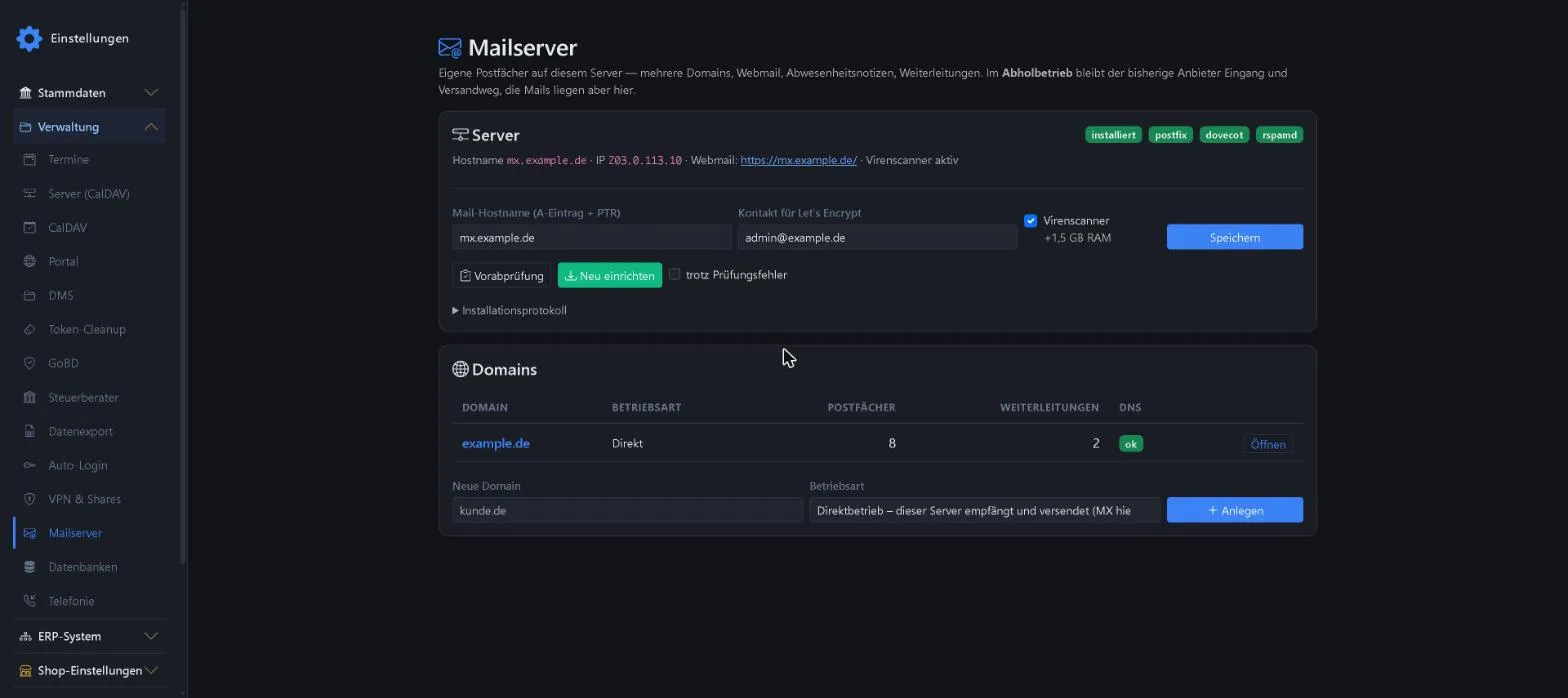
| Field | Meaning |
|---|---|
| Mail hostname (“Mail-Hostname”) | Fully qualified name of the mail server, for example mx.example.de. Requires an A record and a matching reverse DNS record (PTR) pointing to the server IP. |
| Let’s Encrypt contact (“Kontakt für Let’s Encrypt”) | Email address for warnings when a certificate is about to expire. |
| Virus scanner (“Virenscanner”) | Optional. Requires additional memory on the server. |
| Pre-check (“Vorabprüfung”) | Before installation, checks memory, disk, ports, outbound port 25, DNS and PTR. “Trotz Prüfungsfehler” (despite check errors) installs even if there are warnings. |
| Install / Reconfigure (“Installieren / Neu einrichten”) | Sets up Postfix, Dovecot, Rspamd, webmail and the certificate. Takes a few minutes; the installation log is shown live on the page. |
Adding domains
Menu Einstellungen Mailserver Domains
- New domain: name and operating mode. In direct mode (Direktbetrieb), this server receives and sends mail itself (the MX points here). In collection mode (Abholbetrieb), it collects mail from the previous provider and sends via that provider’s server.
- A tenant can have several domains. “Öffnen” (open) takes you to the domain with the DNS assistant, mailboxes, forwarding and settings.
- “Abholbetrieb: beim Anbieter löschen nach … Tagen” (collection mode: delete at provider after … days): collected mail is only deleted at the provider once this period has expired and an external backup exists.
DNS assistant and DKIM
Menu Einstellungen Mailserver Domain öffnen
At the top of the domain page you will find all records that must be created at the domain’s provider, with ready-made values to copy, including the DKIM key. “Jetzt prüfen” (check now) queries DNS and shows “ok” or “fehlt” (missing) for each record.
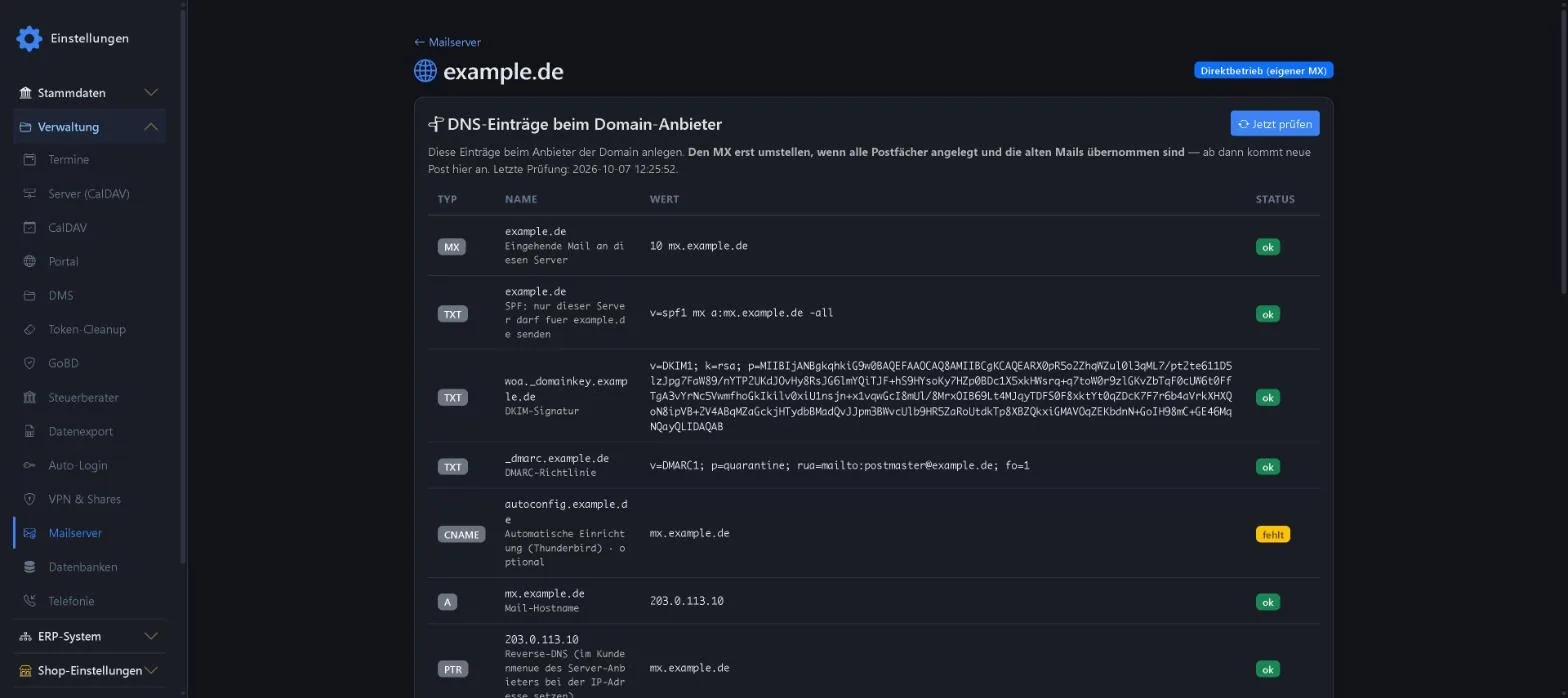
Caution: Only switch the MX once all mailboxes have been created and the old mail has been migrated. From then on, new mail arrives here.
Mailboxes
Menu Einstellungen Mailserver Domain öffnen Postfächer
The list shows all mailboxes of the domain with name and usage. Below it you create new ones: address, name, password (at least 10 characters; the magic wand generates one) and storage in GB.
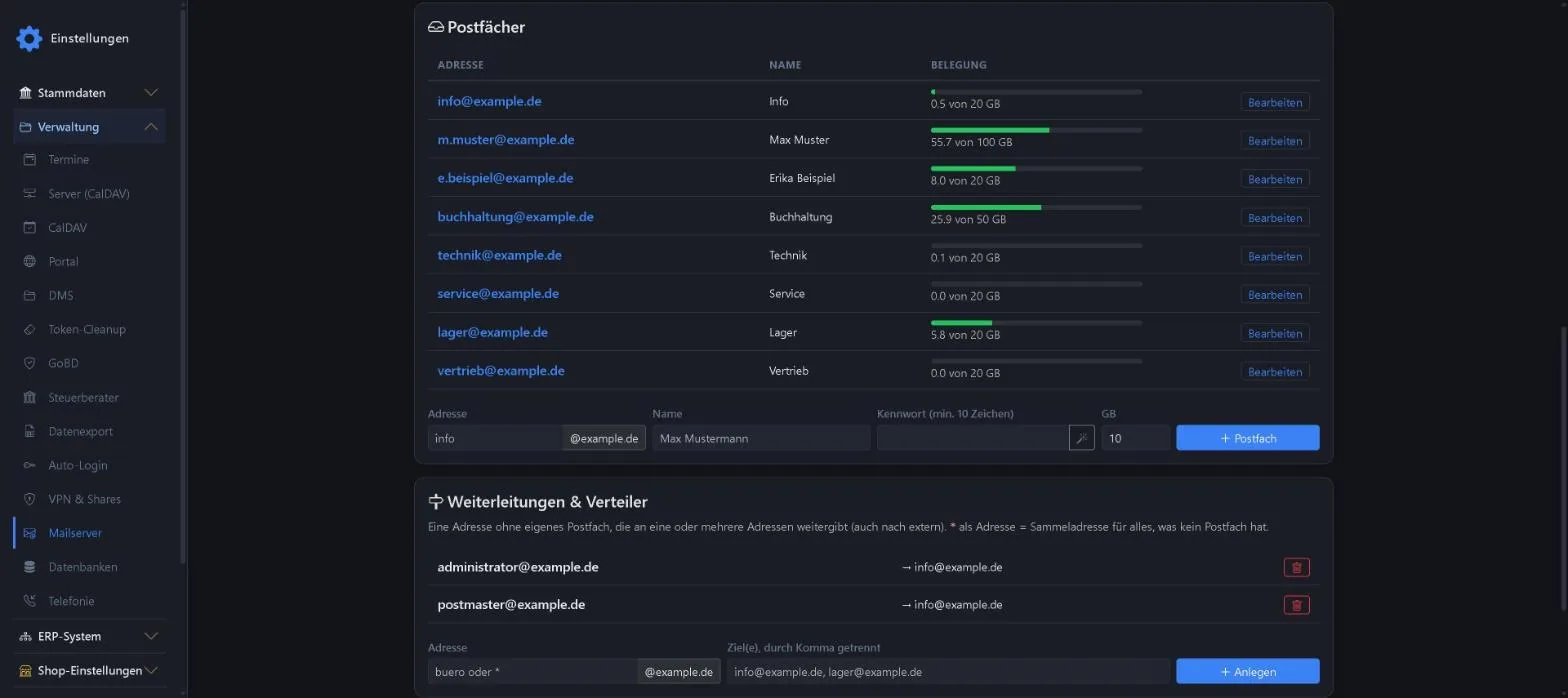
“Bearbeiten” (edit) opens a mailbox:
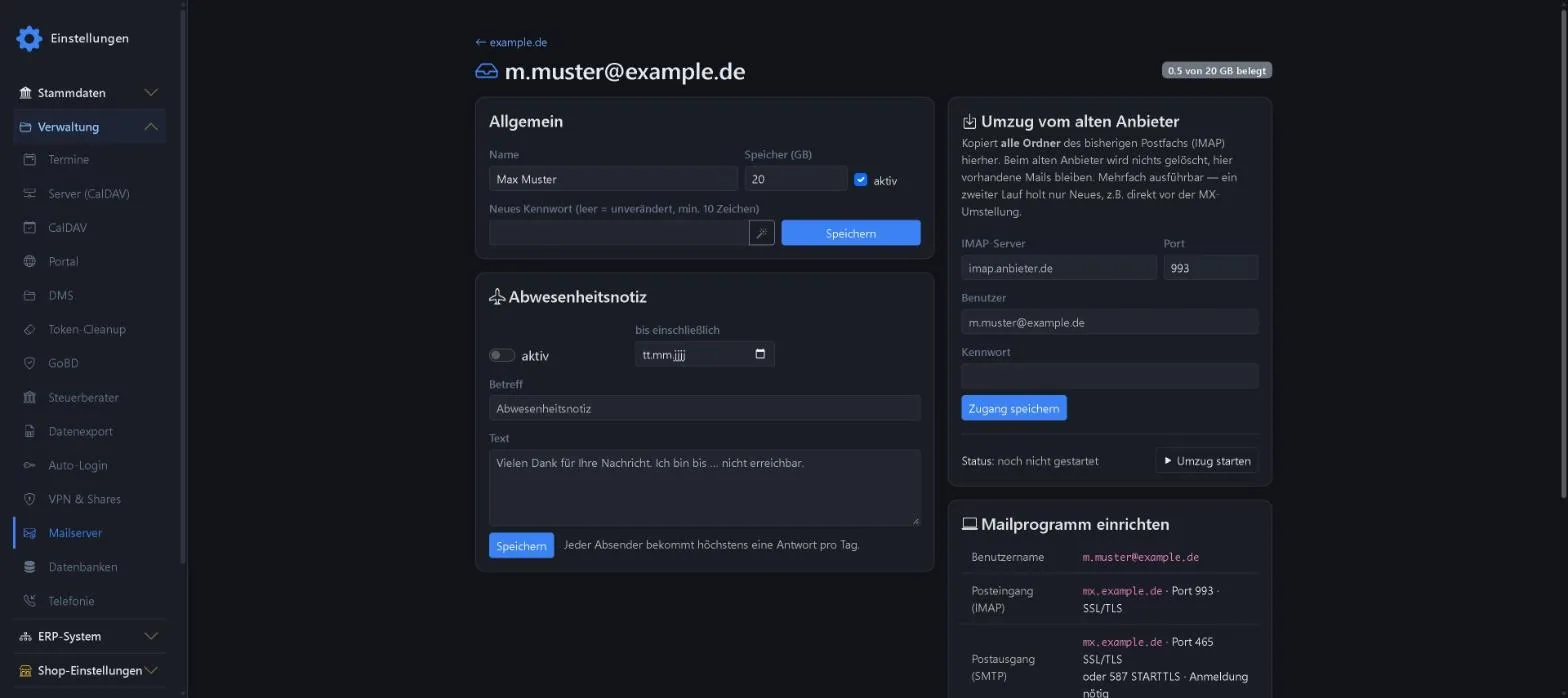
| Section | Content |
|---|---|
| General (“Allgemein”) | Name, storage, active, new password. Stored passwords are never displayed; leaving the field empty means unchanged. |
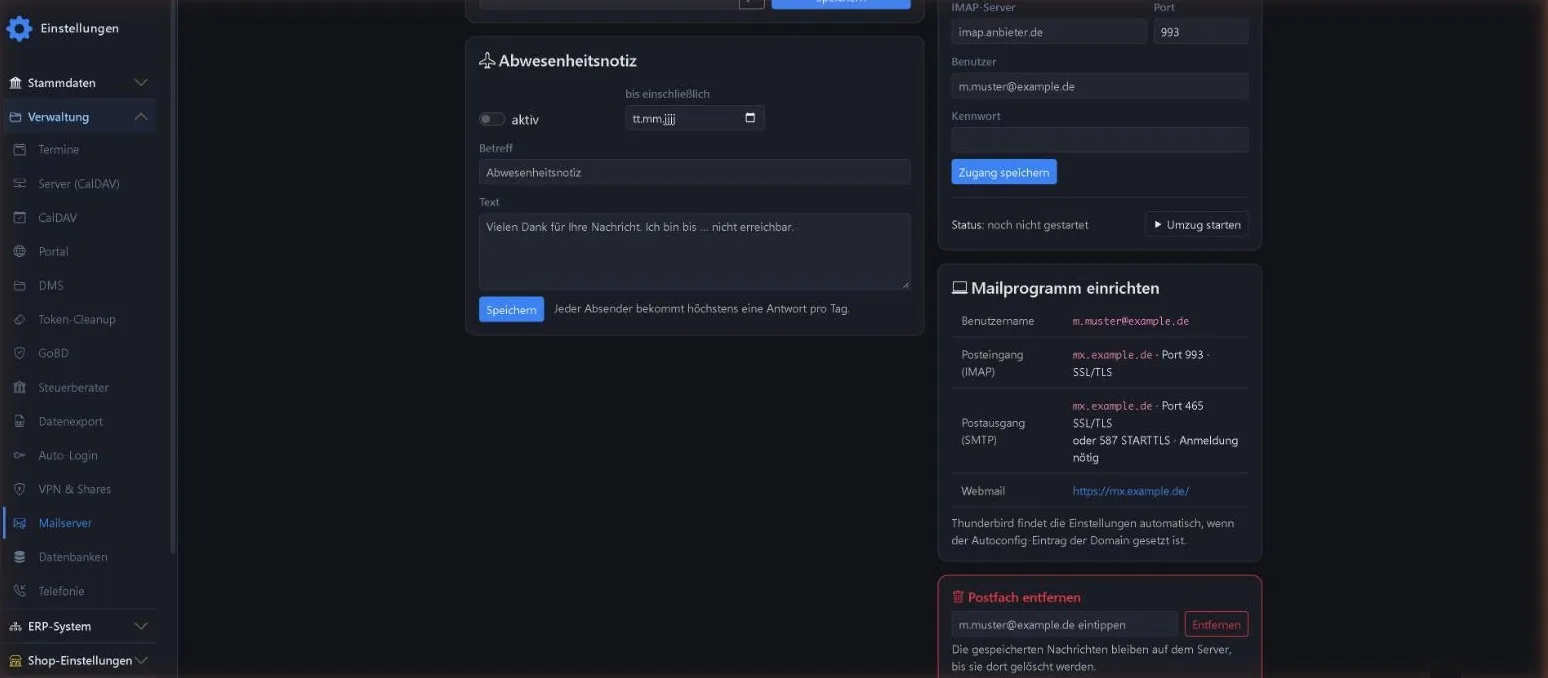
| Out-of-office reply (“Abwesenheitsnotiz”) | Active, until and including (date), subject, text. Each sender receives at most one reply per day. |
| Collection from provider (“Abholung beim Anbieter”) | Collection mode only: protocol (POP3 or IMAP), server, port, user, password. In addition, SMTP server, port, user and password for sending; empty means the same as for collection. |
| “Umzug vom alten Anbieter” (migration from previous provider) | IMAP server, port, user, password, then “Umzug starten” (start migration). Copies all folders, deletes nothing at the old provider, existing mail is kept. |
| “Mailprogramm einrichten” (set up mail client) | Shows the login details for Outlook, Thunderbird and mobile phones. |
| Remove mailbox (“Postfach entfernen”) | As a safeguard, the address must be typed in. The stored messages remain on the server until they are deleted there. |
Tip: The migration can be started as often as you like. A second run only fetches new items, which is useful right before switching the MX.
Forwarding & distribution lists
Menu Einstellungen Mailserver Domain öffnen Weiterleitungen
An address without its own mailbox forwards mail to one or more destinations, including external ones; separate multiple destinations with commas. A * as the address is the catch-all address for everything that has no mailbox.
Tip: Always forward postmaster@ and, where applicable, administrator@ of the domain to a real mailbox.
DNS records for direct mode
Example for the domain example.de on a server with the IP 203.0.113.10. The DNS assistant shows the ready-made values for your domain.
| Name | Type | Value | Purpose |
|---|---|---|---|
mx | A | 203.0.113.10 | name of the mail server |
@ | MX | 10 mx.example.de | where mail for the domain is delivered |
mail | A | 203.0.113.10 | alternative server name for mail clients |
@ | TXT | v=spf1 mx a:mx.example.de ~all | who may send for the domain (SPF) |
woa._domainkey | TXT | v=DKIM1; k=rsa; p=… from the DNS assistant | signature (DKIM) |
_dmarc | TXT | v=DMARC1; p=none; rua=mailto:postmaster@example.de | reporting (DMARC), tighten to quarantine later |
autoconfig | A | 203.0.113.10 | automatic setup in Thunderbird and on mobile phones |
autodiscover | A | 203.0.113.10 | automatic setup in Outlook |
| PTR of the IP | – | mx.example.de | set at the server provider, not in the domain zone |
- Before switching, lower the MX TTL to the minimum (often 600 seconds) and wait at least for the old TTL to expire.
- Without a PTR, large mail providers reject your mail (“bad reputation”).
- Keep the old provider in the SPF record during the transition period (
include:…) and remove it after about a week. - A wildcard record
*covers deleted names. Therefore createautoconfigandautodiscoverexplicitly instead of merely deleting old records.
Settings for mail clients
| Server | Port | Encryption | |
|---|---|---|---|
| Incoming (IMAP) | mx.example.de | 993 | SSL/TLS |
| Outgoing (SMTP) | mx.example.de | 465 (alternatively 587) | SSL/TLS (STARTTLS with 587) |
- The username is the full email address. Outgoing mail requires authentication with the same credentials.
- Webmail:
https://<WoA-Adresse>/webmail/
The matching values for each mailbox are shown in the mailbox view under “Mailprogramm einrichten” (set up mail client):
Outlook suggests the wrong server
Newer versions of Outlook first query Microsoft’s “AutoDetect” service. It guesses the provider from the mail server’s IP address and then suggests, for example, the data centre’s server instead of mx.example.de.
Solution A: in Outlook, choose “Advanced options → Let me set up my account manually → IMAP” and enter the values by hand.
Solution B, for each Windows user with Outlook closed, in the command prompt:
reg add "HKCU\Software\Microsoft\Office\16.0\Outlook\AutoDiscover" /v ExcludeExplicitO365Endpoint /t REG_DWORD /d 1 /fOutlook then uses your server’s own autodiscover.
First mail to a recipient only arrives after 15 minutes
This is greylisting at the recipient’s end: an unknown sending server is temporarily rejected on the first attempt („451 … try later“). Your server automatically retries, after which mail to this recipient goes through without delay. Nothing is lost.
Checklist: migrating from a previous provider
- Install the mail server, add the domain in collection mode (Abholbetrieb), create the mailboxes.
- Start “Umzug vom alten Anbieter” (migration from previous provider) for each mailbox. Large mailboxes take hours.
- Prepare DNS: A record
mx, DKIM, DMARC; PTR at the server provider. Nothing changes for your users yet. - Lower the MX TTL and wait for the old TTL to expire.
- Switch the domain to direct mode (Direktbetrieb) (open domain → settings → operating mode), then check that mail is accepted.
- Switch MX,
mail, SPF,autoconfigandautodiscover. - Run the migration once more for each mailbox.
- Disable the mail service for the domain at the old provider. Otherwise it keeps delivering mail from senders on the same platform internally, without looking at the MX. Run the final sync beforehand; afterwards IMAP access is usually gone as well.
- Send a test mail in and one out from webmail, check the DKIM signature.
- Switch over the mail clients. Calendars and contacts are not transferred via IMAP, so export them beforehand.
- After about a week: remove the old provider from the SPF record, delete old DKIM records.
- Set up an external backup of the mailboxes. Only then delete at the old provider.
Tip: For how this works in practice, see the field report on migrating a customer domain.
Keywords mail server mailbox DNS MX DKIM SPF migration Outlook
Rather have it set up for you?
We set up your server and mail server and move your mailboxes, without your team noticing a thing.
0173 644 22 17